
This back to school craft may look like just a colorful bracelet for kids to make, but here’s the shazam moment: those big swirly colorful beads you see below are actually ERASERS! Now what kid wouldn’t want to walk around with fancy, useful jewelry? Never again will you be caught needing to make a correction without an eraser! No more crossing out mistakes with scribbled lines, you have an ERASELET! Oh yeah, that’s my name for ‘em: Eraser + Bracelet = Eraselet.

In all seriousness I love this project because I am a sucker for products that are both pretty and functional. Sculpey makes this super cool eraser clay and after making erasers from it last year and beads from their regular oven bake clay, it occurred to me that making “eraser beads” would be a really fun back to school craft for kids. So here are all the deets…..


Materials
Eraser Clay available here or at your local craft store
Toothpicks
Elastic Cord
Colorful beads like these and these
Scissors
Baking Sheet
Instructions
Make the Eraser Beads
Step One Preheat your oven according to the directions on the back of the clay packaging.
Step Two Take the eraser clay out of the plastic and pull off chunks of three different colors.
Step Three Smoosh the colors together and knead them to get a swirled pattern going.
Step Four Roll out the swirled clay and cut into roughly ½ in sections.
Step Five Roll one section between your palms to make a circle.
Step Six Pierce the center of the circle with a toothpick and push the toothpick completely through the bead to make a hole.
Step Seven Place the bead on a baking sheet and repeat steps 5 & 6 to make more beads.
Step Eight When you have made as many beads as you like, bake them according to the package directions in your oven. Ours took about 20 minutes to bake and harden.
Step Nine Let the beads cool.

Make the Bracelets
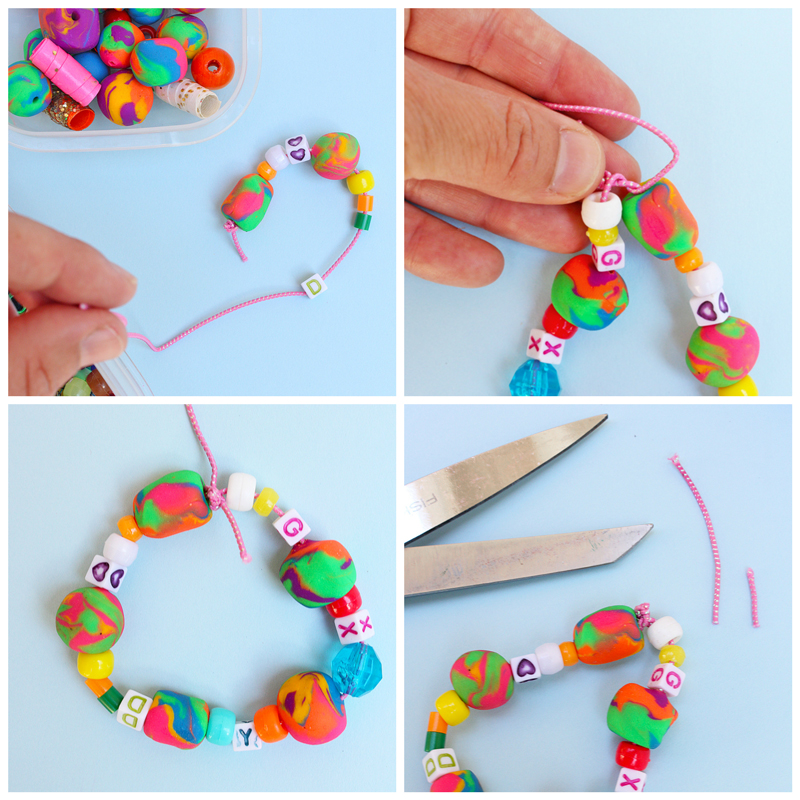
Step One Cut an 8”-10” piece of elastic cording. The length will depend on wrist size. If kids are making these they can use 8” pieces. You will want a little extra cord to comfortably tie and knot the final bracelet.
Step Two String an eraser bead on the cording and follow up with several other colorful beads. Repeat this until you have about 6” of beading. You will want to end the string with the colorful beads, not an eraser bead.
Step Three When the beading is complete tie the loose end onto the knotted end. Tie a super tight knot and trim the cording ends.


You’re done! Now test that puppy out! The eraser beads really work!

Tips
Don’t knead them together too much or your colors will become muddy.
You can test out the length by careful wrapping the bracelet round your wrist, just don’t let go of the open end or your beads will spill off the cord!
Our finished beads were around the size of a marble. You don’t want the beads to be too small or the erasers will be hard to use.


Looks Like
Joe Colombo. Not to be confused with Mafia boss Joseph Colombo, I’m talking about Italian industrial designer Joe Colombo, who was prolific in the 1960’s before his early death at age 41. He ranks as one of the top ten designers I adore. Now our eraser beads look nothing like anything he ever designed BUT the parallel I draw is in function. Joe Colombo’s products were always uber functional. He was obsessed with living systems and designed quite a few products that were all in one-type solutions such as his minikitchen and total furnishing unit. His products never stopped at looking good, they always always had a practical aspect to them. So as we made pretty, FUNCTIONAL jewelry, he immediately came to mind. For more about Joe Colombo check out his bio on DesignBoom and his portfolio on MOMA. You will not want to miss the iconic image of him with a pipe! He was definitely one the design world lost too soon.
Conclusion
So who doesn’t want to sport a few colorful Eraselets this year at school? I mean when you think “back to school craft” you immediately think of bracelets right? Well why not? It satisfies both your back to school fashion and school supply obsession!

 via babbledabbledo

In all seriousness I love this project because I am a sucker for products that are both pretty and functional. Sculpey makes this super cool eraser clay and after making erasers from it last year and beads from their regular oven bake clay, it occurred to me that making “eraser beads” would be a really fun back to school craft for kids. So here are all the deets…..

Back to School Craft: Eraser Bead Bracelets

Materials
Eraser Clay available here or at your local craft store
Toothpicks
Elastic Cord
Colorful beads like these and these
Scissors
Baking Sheet
Instructions
Make the Eraser Beads
Step One Preheat your oven according to the directions on the back of the clay packaging.
Step Two Take the eraser clay out of the plastic and pull off chunks of three different colors.
Step Three Smoosh the colors together and knead them to get a swirled pattern going.
Step Four Roll out the swirled clay and cut into roughly ½ in sections.
Step Five Roll one section between your palms to make a circle.
Step Six Pierce the center of the circle with a toothpick and push the toothpick completely through the bead to make a hole.
Step Seven Place the bead on a baking sheet and repeat steps 5 & 6 to make more beads.
Step Eight When you have made as many beads as you like, bake them according to the package directions in your oven. Ours took about 20 minutes to bake and harden.
Step Nine Let the beads cool.

Make the Bracelets
Step One Cut an 8”-10” piece of elastic cording. The length will depend on wrist size. If kids are making these they can use 8” pieces. You will want a little extra cord to comfortably tie and knot the final bracelet.
Step Two String an eraser bead on the cording and follow up with several other colorful beads. Repeat this until you have about 6” of beading. You will want to end the string with the colorful beads, not an eraser bead.
Step Three When the beading is complete tie the loose end onto the knotted end. Tie a super tight knot and trim the cording ends.

You’re done! Now test that puppy out! The eraser beads really work!

Tips
Don’t knead them together too much or your colors will become muddy.
You can test out the length by careful wrapping the bracelet round your wrist, just don’t let go of the open end or your beads will spill off the cord!
Our finished beads were around the size of a marble. You don’t want the beads to be too small or the erasers will be hard to use.


Looks Like
Joe Colombo. Not to be confused with Mafia boss Joseph Colombo, I’m talking about Italian industrial designer Joe Colombo, who was prolific in the 1960’s before his early death at age 41. He ranks as one of the top ten designers I adore. Now our eraser beads look nothing like anything he ever designed BUT the parallel I draw is in function. Joe Colombo’s products were always uber functional. He was obsessed with living systems and designed quite a few products that were all in one-type solutions such as his minikitchen and total furnishing unit. His products never stopped at looking good, they always always had a practical aspect to them. So as we made pretty, FUNCTIONAL jewelry, he immediately came to mind. For more about Joe Colombo check out his bio on DesignBoom and his portfolio on MOMA. You will not want to miss the iconic image of him with a pipe! He was definitely one the design world lost too soon.
Conclusion
So who doesn’t want to sport a few colorful Eraselets this year at school? I mean when you think “back to school craft” you immediately think of bracelets right? Well why not? It satisfies both your back to school fashion and school supply obsession!


Δημοσίευση σχολίου